THE ART OF MANUFACTURED STONE INSTALLATION
MANUFACTURED STONE VENEER INSTALLATION GUIDE
Manufactured stone veneer installation is a very specialized craft that takes years to perfect. In many ways, we think of it as art! This guide was developed following general industry guidelines, best practices developed by the Masonry Veneer Manufacturers Association, Rocky Mountain Masonry Institute guidelines, as well as field knowledge. We included tips, tricks and best practices from some of the most experienced manufactured stone veneer installers.
This guide is for ZEMENT Stone® COLOR PALETTE ze EARTH COLLECTION and Legacy Stone product lines. Please make sure to check and follow building code in your area before you start any manufactured stone-based improvement project!
Rev. 2/2019
1. GET READY
PROTECT all windows, doors, hardware, trim, floor, etc.
PREPARE surface. Make sure the walls are clean, dry, and straight. We do not recommend installing stone on the exterior walls if the temperature is below 32°F. Additionally, the backup wall needs to be structurally sound in order to bear the weight of the manufactured stone veneer.
FLASHING and CAULKING. Make sure all flashing systems and water-proofing structures are installed correctly. Apply caulk around all openings. 90% of all problems with masonry projects are moisture-related, therefore – flashing and caulking are very important! Masonry veneers are water-resistant, not waterproof, no matter how well they are built.
SAFETY CHECK. Make sure you follow OSHA scaffolding and fall protection requirements.
BUILDING CODE REQUIREMENTS vary by state/city/county/etc. Before you start your project please check with your local jurisdiction for building code requirements that apply.
2. INSTALLATION AND MATERIAL REQUIREMENTS
MANUFACTURED STONE MATERIAL DESCRIPTION
ZEMENT STONE® manufactured stone veneer, including Color Palette ze Earth Collection and Legacy Stone product lines, are used as adhered, non-load bearing exterior or interior veneers on non-fireresistance-rated wood framed or light-gage steel stud construction, concrete or concrete masonryblock walls.
ZEMENT STONE® is light weight, architectural, thin veneer product that is manufactured from a mixture of portland cement, lightweight aggregate, sand, iron oxide pigments, admixtures, various other chemicals and water. It is designed to resemble varios shapes and patterns of natural stone. The unit’s thickness is between 1” to 2.5”. The average saturated weight of the installed veneer units does not exceed 15 pounds per sq.ft (73.2 kg/m2). ZEMENT Stone meets criteria established by ICC-ES AC-51, Acceptance Criteria for Precast Stone Veneer.
INSTALLATION
Cement Plaster Backing may be over Sheathing: plywood, OSB, gupsum sheating, concrete board and fiberboard, supported by wood or steel studs, as described in Section 2.1; or over concret and concrete masonry walls, as described in Section 2.2.
Installation of ZEMENT STONE must comply with this manufacture’s installation guide, Internationak Building Code 2012, International Residentional Code 2012 and apllicable local codes
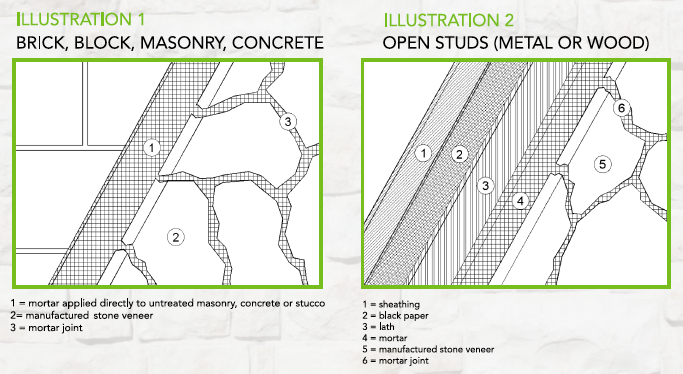
2.1 INSTALLATION OVER SHEATHING (SEE ILLUSTRATION 2)
2.1.1 WATER RESISTIVE BARRIER (WRB).
Should be installed complying with IBC Sections 1404.2 and 2510.6 or IRC Sections R703.2 and R703.6.3. One Layer or Two Layer of No.15 asphalt felt, free from holes and breaks, complying with ASTM D 266 for Type 1 felt or other approved water-resistive barrier shall be applied over studs or sheathing of all exterior walls. It should be attached horizontally starting at the bottom and overlap not less than 2″. Overlap the vertical joints by at least 6″. If using flashing or support brackets (anchors), install them before proceeding to the next step.
2.1.2 FLASHINGS.
Flashings must be installed in compliance with IBC Sections 1405.4 and 1405.10.1.12 or IRC Sections R703.8 and R703.12.2. All Flashings must be corrosion resistant materials and integrated with Water Resistive Barriers (WRB). Flashings must be installed at wall penetrations and terminations of Adhered Stone Veneer installations.
2.1.3 WEEP SCREED.
Weep Screeds must comply with and be installed in accordance with IBC Section 25.1.2 or IRC Section R703.6.2.1, as applicable. In addition weep Screed must be of corrosion resistant metal, min 0.019 inches or min No. 26 gage, or a plastic weep screed min 0.05”, weep holes with a min diameter of 3/16” (4.8 mm) spaced at a max of 33 inches (838 mm) on center and with a minimum vertical attachment flange of 3 ½” wide, which is referenced in IBC Section 1405.10.
2.1.4 LATH.
Studs must be spaced no more than 16” (406mm) on center. Lath must be a corrosion-resistant,
self-furred, 2.5lb/yd2 (1.4kg/m2), galvanized, expanded metal lath in compliance with ASTM C 847.
Lath must be fastened to the wall framing in accordance with the minimum requirements of Section
7.10 of ASTM C 1063 or IRC Section R703.6.1, as applicable. Fasteners must be spaced a maximum of
6 inches (152mm) on center, must penetrate minimum ¾ inch into wood framing members and a minimum of 3/8 inch (9,5mm) through steel members. At corners, overlap the vertical jionts at least 16″ around the corners cracking.
2.2 INSTALLATION OVER CONCRETE AMD MASONRY (SEE ILLUSTRATION 1)
The Veneer units must be installed over concrete and masonry with corrosion-resistant metal lath complying with ASTM C 847 without resistive water barrier or directly to concrete or masonry backing, provided the surface is clean and free of paint or any coatings. If lath is applied, it must be fastened to the wall in accordance with Section 7.10 of ASTM C1063 and Section R703.6.1 or IRC, as applicable. The fasteners must be spaced maximum of 6 inches (152 mm) on center vertically and 16 inches (406 mm) on center horizontally. The gravity load (shear) capacity andnegative wind load (pull-out) capacity of the provided fasteners must be justified to satisfy code official. The Scratch Coat must be applied as described in Section 2.3.
2.3 SCRATCH COAT
Mortar mixed on site or Premixed mortar can be used.
Mix 1: 1 part Portland cement (ASTM C150), 1 part Lime (ASTM C207), 4.5 parts Sand (ASTM C144) and
potable water.
Mix 2: 1 part Type S Masonry Cement (ASTM C91), 2.25 parts Sand (ASTM C144) and potable water.
Mix 3: 1 part Type N Masonry Cement (ASTM C91), 2.25 parts Sand (ASTM C144) and potable water.
Premixed Mortars must meet the requirements of ASTM C270 for Type N or Type S and must meet building code requirements of 50 psi shear bond when tested in accordance with ASTM C482. Recommended ZEMENT Stone Mortar.
Prepare cement mixture according to the manufacturer’s instructions and apply evenly to the lath, using trowel. Scratch coat should be 3/8″ to 1/2″ thick over and embedded into the metal lath. Use a toothed scraper, notched ntrowel or small piece of lath to lightly rake horizontalgrooves inthe scratch coat. Allow the scratchcoat cure for minimum 24 hours.
NOTE: if you plan to install grouted stone, the cement mixture can be dry or fresh at the time of installation. For Dry Stack stone, please make sure you install stone on fresh cement! According to the RMMI, Dry Stack instllation ( open joints) is not recommended for exterior projects in climates with freeze/thaw weather cycles (example Colorado).
2.4 STONE APLLICATION.
You can start laying stones at the top or the bottom of the wall.
Working from the top down may keep mortar droppings from staining stones below, but make sure the mortar is strong enough to hold the suspended stone in place.
If beginning from the bottom, use a straightedge and start 4″ above soil or 2″ above concrete to keep moisture from being absorbed from the ground. If your wall requires corner pieces, place these stones first. After your corner pieces are in place you can continue with the flats. Just before placing the stone, cover 100% of the back of the stone with 1/2″ of mortar. Place a slight excess of mortar at the edges of the stone. This will allow some mortar to squeeze out the stone edges and fill the joints when pressure is applied.
Once the stone has been firmly pressed into the mortar bed, gently tap the stone with a soft mallet to set it in place. Be careful not to tap too hard. Some stud systems may be flexible and setting adjacent stones by tapping may dislodge a stone. Do not disturb or tap the stone after it has been set. The resulting total mortar thickness behind the stone should be between 1/2″ and 11/4”.
2.5 JOINTS
Proper joint width depends on the type of stone being used and the desired For wide joints, more mortar may need to be placed on the back of the stone. For thin joints, less mortar should to be used. Be aware that increasing the amount of mortar on the back of the stone unit increases the possibility of mortar droppings on the stones below it. This also adds extra weight, which may cause the stones to be too heavy and fall off the wall.
NOTE: Make sure to keep your joints uniform in width. If your joints are greater than 1/2″ in width, shrinkage cracks may develop within the joint.
2.6 DESSIGNING YOUR WALL
This is where the ART of MANUFACTURED STONE INSTALLATION begins. Create a pattern you like from the stone pieces. Manufactured stone veneer is made to look like natural stone. Therefore, it has a lot of variety in color, shapes and sizes.
You want your wall to look balanced and organic. To achieve the desired look without compromising structural integrity, follow these guidelines:
All horizontal lines should be no more than 36”.
All vertical lines should not exceed the length of 2 stones.
2.7 CUTTING AND TRIMMING
Some of the stones will still need to be trimmed to fit neatly and maintain uniform joint To cut the stone, use a handheld grinder with a diamond cutting wheel.
After the stone has been cut and trimmed, use a sponge or brush to assure that all grinding residue and dust have been removed.
2.8 GROUT
After the stone is in place and has set for 24 hours, come back and fill the joints using a pointing tool or grout The final joint finish helps the wall resist moisture penetration.
Apply grout generously, so it covers spaces between stone. Let it harden to a thumbprint consistency. Then use wooden stick to remove excess mortar. Next, let it dry. Then, remove access grout with a peace of wood. Last, use dry wire brush to remove large pieces, and finish with a soft dry brush.
Do not use any chemical products, as it can damage your stone!
2.9 CLEAN UP AND ENJOY! Gently brush mortar smears off the stone.
Do not use aggressive high pressure cleaning methods to clean the wall. They might loosen the stone. Do not use metal bristle brush and avoid applying any chemicals to the manufactured stone as permanent damage and discoloration may occur!
3. CARE AND MAINTENANCE
EFFLORESCENCE. Efflorescence is a white, powdery deposit that sometimes appears on the face of masonry walls. Manufactured stone, which is made using cement, is absorbent and often shows efflorescence. You may see a slight efflorescence from the mortar joints if the veneer is installed in an area that occasionally gets saturated.
Efflorescence normally is not harmful but serves as an indicator of excessive moisture exposure. Remove powdery deposits by brushing with a soft brush. Eliminate the source of the moisture and efflorescence will not recur.
SCRAPES AND SCUFFS. Manufactured stone veneer has one main color penetrated all the way through the stone, and a very thin pigmented exterior. Some scuffing on the veneer is expected due to handling and transport to and at the jobsite, thus enhancing its close resemblance to the look of natural stone.
SEALING. Sealing of manufactured stone is not recommended. Some sealers will change the appearance, including the color, of the stone.
MOISTURE. Keep excess moisture from saturating the wall. Adjust landscape sprinklers, downspouts, etc., to prevent water from constantly wetting the wall. Periodically remove any vegetation such as ivy or moss.
CLEANING. Manufactured stone veneer has the main color penetrated all the way through the stone, and a very thin pigmented exterior. Therefore be gentle when cleaning your manufactured stone walls!
– Dirt and other particles can be removed from the surface by using a mild soap detergent mixed with water and a non-metal bristle brush.
– Avoid scrubbing or applying any chemicals as permanent damage and discoloration may occur.
ZEMENT Stone® Installation Guide was designed as a reference guide for construction professionals. Check your local jurisdiction for applicable building code requirements, and follow maufacturers instructions for all non-ZEMENT Stone products.
ZEMENT Stone is compliant with the AC-51. ZEMENT’s manufactured stone veneer has an average compressive strength of 6,130 psi – over three times the AC-51 minimum requirement. Manufactured Stone Veneer It also went through extensive freeze-thaw testing. At the end of 50 freeze-thaw cycles, the average weight loss was only 1.3% – again, exceeding the AC51 requirement of 3.0%.
If you need any additional information, please contact us directly info@zementstone.com or call 303-993-2737.
Copies of detailed installation instructions can be obtained as follows:
- Masonry Veneer Manufacturers Association — masonryveneer.org
- Rocky Mountain Masonry Institute Adhered Stone Veneer Installation Guide – rmmi.org